
자주 활용할 것 같은데 의외로 관련 자료를 찾기 어려운 것이 있습니다. 바로 도메인 객체입니다.
도메인 객체
[번역] 잘 알려진 UI 패턴을 사용하여 리액트 애플리케이션 모듈화하기
위 아티클을 실천하려고 하는데 도메인 객체라는 것을 발견했습니다.
우리나라는 아니지만 도메인 객체는 일상적으로 자주 활용하는듯 합니다. ChatGPT에게 질문하니까 상태 관리와 비즈니스 로직 분리 패턴, 상태 관리와 도메인 객체 분리 패턴이라고 답했습니다.
import React, { useState } from 'react';

class Account {
  constructor(accountNumber, ownerName, balance) {
    this.accountNumber = accountNumber;
    this.ownerName = ownerName;
    this.balance = balance;
  }

  deposit(amount) {
    this.balance += amount;
  }

  withdraw(amount) {
    if (amount <= this.balance) {
      this.balance -= amount;
    } else {
      console.log('Insufficient balance');
    }
  }

  getAccountInfo() {
    return {
      accountNumber: this.accountNumber,
      ownerName: this.ownerName,
      balance: this.balance,
    };
  }
}

function App() {
  const [account, setAccount] = useState(
    new Account('123456', 'John Doe', 1000)
  );
  const [amount, setAmount] = useState(0);

  const handleDeposit = () => {
    account.deposit(amount);
    setAccount(Object.assign({}, account));
  };

  const handleWithdraw = () => {
    account.withdraw(amount);
    setAccount(Object.assign({}, account));
  };

  return (
    <div>
      <h2>Account Information</h2>
      <p>Account Number: {account.accountNumber}</p>
      <p>Owner Name: {account.ownerName}</p>
      <p>Balance: {account.balance}</p>

      <h2>Transaction</h2>
      <input
        type="number"
        value={amount}
        onChange={(e) => setAmount(Number(e.target.value))}
      />
      <button onClick={handleDeposit}>Deposit</button>
      <button onClick={handleWithdraw}>Withdraw</button>
    </div>
  );
}

export default App;
ChatGPT가 알고 있고 괜찮은 예시를 보여주는 것을 보면 표본 사이즈가 상당히 크다는 것을 알 수 있습니다. 왜 국비지원 교육과정에서 도메인 객체에 대해서 얼려주지 않았을까? ㅂㄷㅂㄷ...
일단 도메인 객체를 만들 클래스는 models 혹은 domain이라는 폴더에 넣어서 hook에서 호출하는 방식이 일반적인듯 합니다.
// models/Account.js
export class Account {
  constructor(accountNumber, ownerName, balance) {
    this.accountNumber = accountNumber;
    this.ownerName = ownerName;
    this.balance = balance;
  }

  deposit(amount) {
    this.balance += amount;
  }

  withdraw(amount) {
    if (amount <= this.balance) {
      this.balance -= amount;
    } else {
      console.log('Insufficient balance');
    }
  }

  getAccountInfo() {
    return {
      accountNumber: this.accountNumber,
      ownerName: this.ownerName,
      balance: this.balance,
    };
  }
}
// hooks/useAccount.js
import { Account } from '../models/Account.js';
export function useAccount(accountNumber, ownerName, balance) {
  const [account, setAccount] = useState(
    new Account(accountNumber, ownerName, balance)
  );
  const [amount, setAmount] = useState(0);

  const handleDeposit = () => {
    account.deposit(amount);
    setAccount(Object.assign({}, account));
  };

  const handleWithdraw = () => {
    account.withdraw(amount);
    setAccount(Object.assign({}, account));
  };
  return { account, amount, setAmount, handleDeposit, handleWithdraw };
}
function App() {
  const { account, amount, setAmount, handleDeposit, handleWithdraw } =
    useAccount('123456', 'John Doe', 1000);

  return (
    <div>
      <h2>Account Information</h2>
      <p>Account Number: {account.accountNumber}</p>
      <p>Owner Name: {account.ownerName}</p>
      <p>Balance: {account.balance}</p>

      <h2>Transaction</h2>
      <input
        type="number"
        value={amount}
        onChange={(e) => setAmount(Number(e.target.value))}
      />
      <button onClick={handleDeposit}>Deposit</button>
      <button onClick={handleWithdraw}>Withdraw</button>
    </div>
  );
}
이렇게 되면 프론트엔드에서 MVC 패턴으로 분리가 가능합니다. 물론 지금 코드 (e) => setAmount(Number(e.target.value))를 함수로 정의하고 호출하면 완벽할 것 같습니다.
만약 API 호출과 관련된 일이 발생하면 hook 안에서 처리하면 될 것 같습니다. 궁금한 것은 계좌가 여러개일 때 어떻게 처리하는지 궁금합니다.
// Model - AccountCollection.js
class AccountCollection {
  constructor() {
    this.accounts = [];
  }

  createAccount(accountNumber, ownerName, balance) {
    const account = new Account(accountNumber, ownerName, balance);
    this.accounts.push(account);
  }

  deleteAccount(accountNumber) {
    this.accounts = this.accounts.filter(
      (account) => account.accountNumber !== accountNumber
    );
  }

  // 필요한 다른 계좌 관련 메서드들...
}

// Hook - useAccountCollection.js
import { useState, useEffect } from 'react';
import { fetchAccounts } from './api'; // API 통신을 위한 함수

export function useAccountCollection() {
  const [accountCollection, setAccountCollection] = useState(
    new AccountCollection()
  );
  const [isLoading, setIsLoading] = useState(false);

  useEffect(() => {
    setIsLoading(true);
    fetchAccounts()
      .then((accounts) => {
        // API에서 받아온 데이터로 계좌 목록 업데이트
        accountCollection.updateAccounts(accounts);
        setAccountCollection(accountCollection);
      })
      .finally(() => setIsLoading(false));
  }, []); // 컴포넌트가 처음 마운트될 때만 호출

  return { accountCollection, isLoading };
}

// View - AccountListView.js
import { useAccountCollection } from './useAccountCollection';

function AccountListView() {
  const { accountCollection, isLoading } = useAccountCollection();

  if (isLoading) {
    return <div>Loading...</div>;
  }

  return (
    <div>
      <h2>Account List</h2>
      <ul>
        {accountCollection.accounts.map((account) => (
          <li key={account.accountNumber}>
            Account Number: {account.accountNumber}, Owner: {account.ownerName},
            Balance: {account.balance}
          </li>
        ))}
      </ul>
    </div>
  );
}

// Usage
function App() {
  return <AccountListView />;
}
전체적으로 이런 패턴입니다. 모듈별로 분류하면 이렇게 할 수 있습니다.
// Model - AccountCollection.js
class Account {
  constructor(accountNumber, ownerName, balance) {
    this.accountNumber = accountNumber;
    this.ownerName = ownerName;
    this.balance = balance;
  }

  deposit(amount) {
    this.balance += amount;
  }

  withdraw(amount) {
    if (amount <= this.balance) {
      this.balance -= amount;
    } else {
      console.log('Insufficient balance');
    }
  }

  getAccountInfo() {
    return {
      accountNumber: this.accountNumber,
      ownerName: this.ownerName,
      balance: this.balance,
    };
  }
}

class AccountCollection {
  constructor() {
    this.accounts = [];
  }

  createAccount(accountNumber, ownerName, balance) {
    const account = new Account(accountNumber, ownerName, balance);
    this.accounts.push(account);
  }

  deleteAccount(accountNumber) {
    this.accounts = this.accounts.filter(
      (account) => account.accountNumber !== accountNumber
    );
  }

  // 필요한 다른 계좌 관련 메서드들...
}
여기서는 비즈니스 로직을 모두 담습니다. 그리고 도메인 객체 중에서 Account는 개별 Record에 해당하기 때문에 직접 노출하는 경우는 일반적이지 않다고 합니다. Account의 묶음(Collection)으로 모든 것은 AccountCollection에게 중재자로 위임하고 처리하는 것이 일반적입니다.
// Hook - useAccountCollection.js
import { useState, useEffect } from 'react';
import { fetchAccounts } from './api'; // API 통신을 위한 함수

export function useAccountCollection() {
  const [accountCollection, setAccountCollection] = useState(
    new AccountCollection()
  );
  const [isLoading, setIsLoading] = useState(false);

  useEffect(() => {
    setIsLoading(true);
    fetchAccounts()
      .then((accounts) => {
        // API에서 받아온 데이터로 계좌 목록 업데이트
        accountCollection.updateAccounts(accounts);
        setAccountCollection(accountCollection);
      })
      .finally(() => setIsLoading(false));
  }, []); // 컴포넌트가 처음 마운트될 때만 호출

  return { accountCollection, isLoading };
}
updateAccounts는 생략했지만 accountCollection이 새로운 객체가 되게 만듭니다.
hook은 controller 역할을 하고 도메인 객체 즉 model을 호출하는 것이 일반적입니다.
// View - AccountListView.js
import { useAccountCollection } from './useAccountCollection';

function AccountListView() {
  const accountCollection = useAccountCollection();

  return (
    <div>
      <h2>Account List</h2>
      <ul>
        {accountCollection.accounts.map((account) => (
          <li key={account.accountNumber}>
            Account Number: {account.accountNumber}, Owner: {account.ownerName},
            Balance: {account.balance}
          </li>
        ))}
      </ul>
    </div>
  );
}
이렇게 hook의 controller를 view가 호출하고 값을 주입받습니다. 지금은 이벤트를 처리할 함수가 없지만 이벤트에 따라 갱신이 필요할 때 주입받으면 됩니다.
// Usage
function App() {
  return <AccountListView />;
}
지금은 App이지만 평소에는 Page에 해당하는 컴포넌트를 넣으면 됩니다.
font 고르고 설정하기
여기서는 편의를 위해 서체 대신 폰트라고 부르겠습니다.
일상적으로 우리가 폰트(font)라고 부르지만 올바른 용어는 서체(typeface)입니다. 폰트는 서체, 사이즈, 무게, 이텔릭 등 조판을 의미합니다.
예를 들어, 나눔 고딕 - 16px - Regular, 나눔 고딕 - 24px - Bold 이라고 하면 폰트는 2개이고 서체는 나눔고딕 1개를 의미합니다.
UX/UI 디자이너였을 때 가장 포괄적으로 사용할 수 있는 폰트를 고민했었습니다. Noto Sans KR도 분명 훌륭한 폰트이고 시스템 폰트도 훌륭합니다.
하지만 가장 훌륭한 폰트는 spoqa han sans 라는 결론을 얻었습니다.
@import url(//spoqa.github.io/spoqa-han-sans/css/SpoqaHanSansNeo.css);

* {
  font-family: 'Spoqa Han Sans Neo', 'sans-serif';
}
개인적으로 첫째로 제일 중요한 점은 숫자가 모노스페이스여야 한다는 점입니다.
중요한 점이 ��몇가지 있는데 영한 baseline 조화입니다.
그리고 영어와 한글을 같이 사용할 때 자연스러운가?
최선은 Spoqa Han Sans Neo였습니다.
적용할 때는 html head에 넣어서 적용하도록 합니다.
<link
  href="//spoqa.github.io/spoqa-han-sans/css/SpoqaHanSansNeo.css"
  rel="stylesheet"
  type="text/css"
/>
import { css } from '@emotion/react';

const GlobalStyle = css`
  /* ...생략... */
  body {
    line-height: 1;
    overflow-x: hidden;
    font-family: 'Spoqa Han Sans Neo', 'sans-serif';
  }
  /* ...생략... */
`;

export default GlobalStyle;
css가 적용되어있는데 취소선이 그어져있는건 어떤상황인가요? - okky
크롬 개발자 도구를 확인해보니까 취소선이 그어졌습니다. 그래서 검색을 해봤습니다. 덮어쓰기 문제라고 합니다.
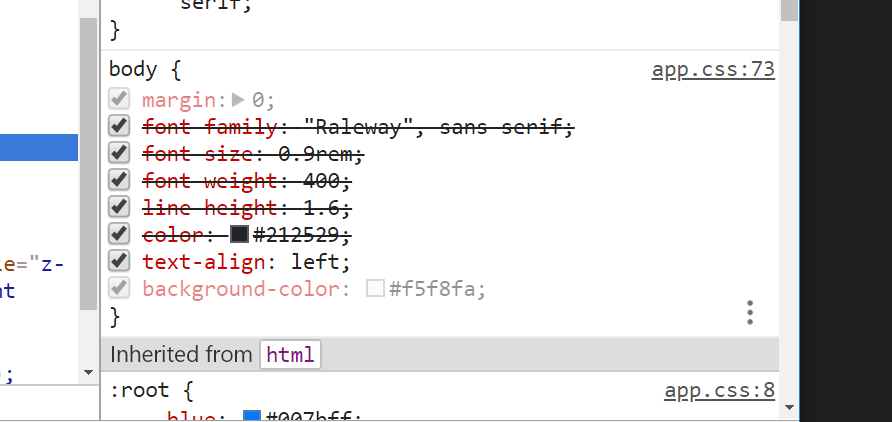
대응을 나중에 하도록 하겠습니다. 현재 mvp에서 덜 중요합니다. 일단 폰트자체는 적용이 되어 있습니다.
컬러 적용
{
  "black": "#000000",
  "white": "#ffffff",
  "gray-50": "#F9FAFB",
  "gray-100": "#F3F4F6",
  "gray-200 ": "#E5E7EB",
  "gray-300 ": "#D1D5DB",
  "gray-400": "#9CA3AF",
  "gray-500": "#6B7280",
  "gray-600": "#6B7280",
  "gray-700": "#374151",
  "gray-800": "#1F2937",
  "gray-900": "#111827"
}
모노톤으로 단순하게 만들기 위해 추가했습니다. 또 기능 동작에 피드백을 잘 제공하기 위해 시멘틱 컬러도 추가했습니다.
const theme = {
  colors: {
    red: '#EF4444',
    yellow: '#F59E0B',
    green: '#10B981',
    blue: '#3B82F6',
    black: '#000000',
    white: '#ffffff',
    gray050: '#F9FAFB',
    gray100: '#F3F4F6',
    gray200: '#E5E7EB',
    gray300: '#D1D5DB',
    gray400: '#9CA3AF',
    gray500: '#6B7280',
    gray600: '#6B7280',
    gray700: '#374151',
    gray800: '#1F2937',
    gray900: '#111827',
  },
  fonts: {},
};

export default theme;
red는 거절, yellow는 경�고, green은 승인, blue는 정보 4가지 기본 시멘틱을 제공할 것입니다.
font에 기본적인 body 1개만 제공해고 괜찮을 것 같습니다. 최소한으로 시작하고 성장하면서 자원을 공유하는 방식이 적합해보입니다.
필요한 것을 미리알기는 어렵습니다.
질문 주도 개발(QDD, Question Driven development)
최종 목표를 설정하고 목표에 도달하기 위해해야 할 질문목록을 만듭니다.
간단한 프로젝트를 찾아보도록 합니다.
질문을 하고 코드를 보고 본인의 코드베이스에 맞게 어느정도 편집해야 합니다.
긍정적인 피드백 루프를 만들어야 합니다.
MVP까지 설정하고 구현에 성공하면 달성한 것으로 간주합니다.
질문을 작게 쪼갭니다. 작고 구체적인 질문들을 하고 합치면 큰 질문을 해결하게 되는 것입니다. 이것은 중요한 디컴포지션입니다.
잠시 다른길
Vite Server Options (server.fs.deny) can be bypassed using double forward-slash (//)
github를 확인해보니까 보안문제가 있다고 합니다. vite의 최근버전으로 업데이트하면 된다고 합니다. 업데이트 진행하겠습니다.
개인적으로 작성했던 react-repo를 private으로 바꿨습니다. 배포할 겸 새로운 레포를 만들었습니다.
backend merge
일단 flash card를 위한 backend는 merge했습니다. 이제 프론트엔드에 집중해서 작성하면 됩니다.
Write tests. Not too many. Mostly integration.
Write tests. Not too many. Mostly integration.
- Guillermo Rauch
Kent C. Dodds – Write tests. Not too many. Mostly integration.
Write tests. Not too many. Mostly integration.
테스트는 자신감을 줍니다. 정신적인 측면입니다.
너무 많이 작성할 필요는 없습니다. 테스트 커버리지는 테스트를 얼마나 많이 했는지 확인하는 지표입니다. 몇 퍼센트가 좋은가? 예상하듯이 상황에 따라 다릅니다.
시간당 커버리지는 생각보다 높지 않습니다. 커버리지를 중시하는 시점이 있고 아닌 시점이 있습니다.
작은 라이브러리는 100%는 생각보다 쉽습니다. 대부분 라이브러리 코드를 테스트하기 쉽습니다. 하지만 어플케이션은 커버리지를 굳이 설정할 필요는 없습니다.
커버리지 100%를 하면 모든 구현 디테일을 테스트하기 시작합니다. 원래 private 메서드여야 할 것이 노출되는 문제가 있습니다. 테스트만을 위해 노출하는 것은 문제가 될 것입니다. 구현 디테일을 테스트하면 리팩토링에 오히려 곤란해집니다.
구현을 테스트하지 않습니다. 그래서 너무 많이 테스트할 필요는 없습니다.
정적 분석도 테스트입니다. 굳이 필요하지 않은 테스트를 제거합니다. 또 개별 실행도 필요 없습니다.
테스트는 비즈니스 로직을 검증해야 합니다. 유닛테스트는 비교적 간단합니다. mocking하기 시작하면 복잡해집니다. 결합테스트는 서버도 필요합니다.
결합테스트는 아주 중요합니다. 문제를 예방하는 효율이 제일 좋습니다.
E2E 테스트는 브라우저처럼 유저의 행동을 재현합니다.
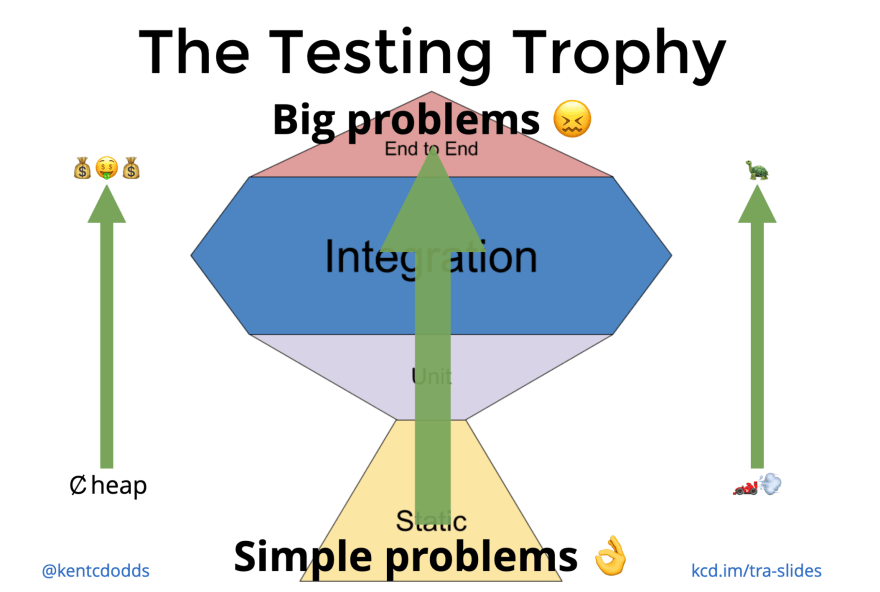
테스팅 트로피는 대략적인 원칙입니다. 정적 분석이 대신 처리해주는 일이 상당히 많습니다. 유닛테스트도 조금 적당히 작성해줍니다. 그리고 결합테스트에 제일 많이 집중합니다. 또 E2E는 제일 비용이 큽니다.
자신감한계효용이 있습니다. 테스트가 E2E테스트에 가까워질수록 자신감이 늘어납니다. 하지만 한계효용도 가까워집니다.
결합테스트는 비교적 저렴하고 검증하기 위해 지불하는 비용당 이익이 좋습니다.
단위테스트도 상당히 유용하고 좋습니다. 또 E2E 테스트도 해피페스 검증하기 상당히 유용합니다.
단위테스트를 결합테스트로 작성할 때 방법입니다.
- 현실의 구명을 몇개 뚤어보도록 합니다. 몇가지 특수한 상황을 가정하고 테스트를 작성합니다.
- 높은 트리에서 접근합니다. 랜더링 여부 새냅샷 검증 대신에 트리 상위로 이동하고 유저의 행동에 따라 올바르게 랜더링하는지 검증하는 것이 더 가치있습니다.
- 테스트 코드는 컴포넌트와 컴포넌트가 결합하는 지점 혹은 페이지 컴포넌트에서 페이지 전체적으로 발생하는 동작을 검증합니다.
BDD
상황에 따라 행동이 달라집니다. 이런 이유로 describe, context, it으로 설계합니다. 그냥 테스트를 설계하면 어떻게 설계해야 할 줄 모릅니다. 하지만 인간이 잘하는 것은 상상입니다. 유저가 행동할 것 같은 경로 행위의 순서부터 검증하는 방식으로 테스트 코드를 작성하기 시작하는 것이 방법입니다.
Given-When-Then 패턴에서 render는 When
Given-When-Then 패턴에서 render는 처리 즉 When에 작성하는 것이 일반적입니다.
import { describe, vi } from 'vitest';
import { Button } from '.';
import { render, screen } from '@testing-library/react';
import user from '@testing-library/user-event';

describe('Button', () => {
  it('should invoke the function when the button is clicked', async () => {
    // Given
    user.setup();
    const btnText = 'Button';
    const mock = vi.fn(() => 0);

    // When
    render(<Button onClick={mock}>{btnText}</Button>);
    const btnElement = screen.getByRole('button');
    await user.click(btnElement);

    // Then
    expect(btnElement).toBeInTheDocument();
    expect(mock).toHaveBeenCalledTimes(1);
  });
});
Given은 주어진 상황 맥락을 알려줍니다. When은 그 맥락에 맞게 처리하는 것입니다. Then은 그 처리 결과입니다.
참고로 지금 예시에서는 주석이 남아있지만 일반적으로 줄바꿈과 변수명만으로 표현하는 것이 일반적입니다.