bun 1.0 출시
블리딩 엣지 Deno를 사용하다가 과다출혈을 그렇게 당하고도 아직도 정신 못차린 것 같습니다.
Bun 1.0 is here 영상
저처럼 문해력 딸리는 사람을 위한 유튜브 영상을 가져왔습니다.
Bun 1.0 공식 블로그
하지만 문해력은 없지만 직접 시도해보고 싶은 사람들을 위해 블로그 링크를 준비했습니다.
또 저처럼 영어실력 부족한 여러분들을 위해 번역도 같이 다루겠습니다. 모두는 안 다루고 또 일부 편집해서 다룰 것입니다.
Bun 1.0 is finally here.
Bun 1.0이 드디어 출시되었습니다.
Bun is a fast, all-in-one toolkit for running, building, testing, and debugging JavaScript and TypeScript, from a single file to a full-stack application. Today, Bun is stable and production-ready.
Bun은 빠르고 자바스크립트와 타입스크립트 모두를 위한 실행, 빌딩, 테스트, 디버거 모든 것을 갖고 있는 툴킷입니다. 하나의 파일로 풀스택 앱을 구현할 수 있습니다. 오늘 Bun은 table 릴리즈이고 production에서 사용해도 괜찮습니다.
Bun의 철학
Bun is an all-in-one toolkit
We love JavaScript. It's mature, it moves fast, and its developer community is vibrant and passionate. It's awesome.
우리는 자바스크립트를 사랑합니다. 성숙하고 빠르게 움직이고 개발자 커뮤니티는 각양각색하고 열정적입니다. 어썸합니다.
However, since Node.js debuted 14 years ago, layers and layers of tooling have accumulated on top of each other. And like any system that grows and evolves without centralized planning, JavaScript tooling has become slow and complex.
하지만 14년 전 Node.js 데뷔 이후 여러 계층의 툴링이 서로 뒤덮여있습니다. 중앙에서 계획 없이 자라나고 진화하는 모든 시스템처럼 자바스크립트 툴링은 느려지고 복잡해졌습니다.
Why Bun exists
Bun's goal is simple: eliminate slowness and complexity without throwing away everything that's great about JavaScript. Your favorite libraries and frameworks should still work, and you shouldn't need to unlearn the conventions you're familiar with.
Bun의 복표는 단순합니다. 자바스크립트의 장점은 남겨두고 느리고 복잡함을 제거하는 것입니다. 당신의 최애 라이브러리와 프레임워크는 여전히 동작하고 익숙했던 컨벤션을 날릴 필요없어야 합니다.
You will however need to unlearn the many tools that Bun makes unnecessary:
하지만 당신은 Bun이 필요없게 만드는 여러 툴을 잊어야 합니다.
여기까지가 Bun의 중심이 되는 철학입니다. Bun은 Runtime, Transpilers, Bundlers, Package Managers, Test Runner입니다.
설치
docker pull oven/bun
docker run --rm --init --ulimit memlock=-1:-1 oven/bun
개인적으로 제일 권장하는 docker입니다.
Does bun has any docker image available?
이슈에서 권장하는 docker image입니다. 공식문서좀 읽으라고 하는군요.
실제로 직접 운영 중인 docker입니다.
brew tap oven-sh/bun
brew install bun
docker를 모르면 brew로 설치하기 바랍니다. 저는 아직도 docker를 설명서만 보고 하죠 정확히 이해는 못하고 있습니다.
테크 인플루언서들의 반응
fireship
Lee Robinson
Theo
bun으로 만드는 유사 백엔드 개발 실전
brew tap oven-sh/bun
brew install bun
먼저 설치합시다. 저는 운영체제 수업 완강하기 전까지는 docker 활용을 자제하겠습니다.
bun -v이렇게 버전을 확인해봅시다. 저는 1.0.2가 나왔습니다.
bun init원하는 폴더에 들어가서 위 명령으로 초기화 설정을 해주시기 바랍니다. 저는 아주 창의적인 이름의 bun-crud라고 했습니다. 그리고 엔트리포인트는 index.ts로 유지했습니다. 마법사 선택지 2개밖에 없습니다.
file 읽고 쓰기
console.log('Hello via Bun!');

const file = Bun.file('package.json');

const print = await file.json(); // {...}

console.log(print);
위처럼 작성하고 실행해봅시다.
bun run index.ts그럼 본인 package.json출력을 확인할 수 있을 것입니다.
이제 읽기를 했다면 쓰기를 해봅시다.
await Bun.write(
  'index.html',
  `<html><body><h1>hello bun html</h1></body></html>`
);
이렇게 작성하고 실행해보면 html파일이 생성된 것을 볼 수있을 것입니다. 나중에 htmx로 이상한 짓거리를 해봅시다.
서버
Bun.serve({
  port: 3000,
  fetch(request) {
    return new Response('Hello from Bun!');
  },
});
위처럼 작성하고 다음 명령을 하기 바랍니다.
bun --hot index.ts위처럼 명령해야 입력마다 서버가 HMR를 지원하고 업데이트합니다.
http://localhost:3000/ 에서 get 요청을 해봅시다. Hello from Bun!을 볼 수 있을 것입니다.
SQLite 내장 DB 활용하기
인메모리 DB를 사용하고 있습니다.
DB는 better-sqlite3을 사용하고 있습니다. 그래서 해당 문서를 참고하면 DB 구현이 가능합니다.
하지면 더 좋은 ORM을 같이 사용하기 바랍니다.
지금 다룰 예시에는 ORM이 없습니다.
import { Database } from 'bun:sqlite';

const db = Database.open(':memory:');
// highlight-start
db.exec(
  `CREATE TABLE todos (id INTEGER PRIMARY KEY AUTOINCREMENT, title TEXT, content TEXT, done INTEGER)`
);
// highlight-end
위처럼 작성하면 sqlite 테이블을 정의한 것입니다. 이제 여기에 CRUD를 하겠습니다.
참고로 테이블의 스키마 정의는 다음처럼 할 것입니다.
type TodoType = {
  id?: number;
  title: string;
  content: string;
  done: boolean;
};
이런 스키마를 활용할 것입니다.
GET
데이터는 특별히 없지만 쉬워보이는 GET 메서드부터 구현합니다.
import { Database } from 'bun:sqlite';

const db = Database.open(':memory:');
db.exec(
  `CREATE TABLE todos (id INTEGER PRIMARY KEY AUTOINCREMENT, title TEXT, content TEXT, done INTEGER)`
);

Bun.serve({
  port: 3000,
  fetch(request) {
    // highlight-next-line
    return new Response('404!');
  },
});
먼저 특별한 설정을 안하면 404로 가도록 합시다.
import { Database } from 'bun:sqlite';

const db = Database.open(':memory:');
db.exec(
  `CREATE TABLE todos (id INTEGER PRIMARY KEY AUTOINCREMENT, title TEXT, content TEXT, done INTEGER)`
);

Bun.serve({
  port: 3000,
  fetch(request) {
    // highlight-start
    if (request.method === 'GET' && url.pathname.split('/')[1] === 'todo') {
      const todos = db.query('SELECT * FROM todos').all();
      return new Response(JSON.stringify(todos), { status: 200 });
    }
    // highlight-end
    return new Response('404!');
  },
});
Thunder Client든 Postmen이든 본인이 편한거 활용하기 바랍니다.
http://localhost:3000/todo
여기로 GET 요청하면 빈 배열([])을 돌려줄 것입니다.
POST
import { Database } from 'bun:sqlite';

const db = Database.open(':memory:');
db.exec(
  `CREATE TABLE todos (id INTEGER PRIMARY KEY AUTOINCREMENT, title TEXT, content TEXT, done INTEGER)`
);

Bun.serve({
  port: 3000,
  fetch(request) {
    if (request.method === 'GET' && url.pathname.split('/')[1] === 'todo') {
      const todos = db.query('SELECT * FROM todos').all();
      return new Response(JSON.stringify(todos), { status: 200 });
    }

    // highlight-start
    if (request.method === 'POST' && url.pathname.split('/')[1] === 'todo') {
      // body를 확인
      const { title, content, done } = await request.json<{
        title: string;
        content: string;
        done: boolean;
      }>();

      // insert 문
      const insert = db.prepare(
        'INSERT INTO todos (title, content, done) VALUES ($title, $content, $done)'
      );
      // insert 처리
      insert.run({ $title: title, $content: content, $done: done });

      return new Response(JSON.stringify({ title, content, done }), {
        status: 201,
      });
    }
    // highlight-end
    return new Response('404!');
  },
});
http://localhost:3000/todo
{
  "title": "json은 존슨이 아닙니다.",
  "content": "더글라스 크락포드도 포기했습니다.",
  "done": false
}
여기로 위 json을 담아서 POST 요청합니다. 무슨 내용인지 너무 신경쓰지마세요. 나중을 위해 2번 요청하세요
방금 보낸 json을 응답으로 받을 것입니다.
DELETE
삭제가 서순상 더 쉽습니다. 그래서 먼저합니다.
import { Database } from 'bun:sqlite';

const db = Database.open(':memory:');
db.exec(
  `CREATE TABLE todos (id INTEGER PRIMARY KEY AUTOINCREMENT, title TEXT, content TEXT, done INTEGER)`
);

Bun.serve({
  port: 3000,
  fetch(request) {
    if (request.method === 'GET' && url.pathname.split('/')[1] === 'todo') {
      const todos = db.query('SELECT * FROM todos').all();
      return new Response(JSON.stringify(todos), { status: 200 });
    }

    if (request.method === 'POST' && url.pathname.split('/')[1] === 'todo') {
      // body를 확인
      const { title, content, done } = await request.json<{
        title: string;
        content: string;
        done: boolean;
      }>();

      // insert 문
      const insert = db.prepare(
        'INSERT INTO todos (title, content, done) VALUES ($title, $content, $done)'
      );
      // insert 처리
      insert.run({ $title: title, $content: content, $done: done });

      return new Response(JSON.stringify({ title, content, done }), {
        status: 201,
      });
    }

    // highlight-start
    if (
      request.method === 'DELETE' &&
      url.pathname.split('/')[1] === 'todo' &&
      url.pathname.split('/')[2]
    ) {
      const [, path, id] = url.pathname.split('/');
      const deleteTodo = db.prepare(`DELETE from todos WHERE id = ${id}`);
      deleteTodo.run();
      return new Response(null, { status: 204 });
    }
    // highlight-end
    return new Response('404!');
  },
});
http://localhost:3000/todo/1
위로 DELETE 요청을 보내면 삭제를 처리할 것입니다.
UPDATE
import { Database } from 'bun:sqlite';

const db = Database.open(':memory:');
db.exec(
  `CREATE TABLE todos (id INTEGER PRIMARY KEY AUTOINCREMENT, title TEXT, content TEXT, done INTEGER)`
);

Bun.serve({
  port: 3000,
  fetch: async (request) => {
    const url = new URL(request.url);

    if (request.method === 'GET' && url.pathname.split('/')[1] === 'todo') {
      const todos = db.query('SELECT * FROM todos').all();
      return new Response(JSON.stringify(todos), { status: 200 });
    }

    if (request.method === 'POST' && url.pathname.split('/')[1] === 'todo') {
      // body를 확인
      const { title, content, done } = await request.json<{
        title: string;
        content: string;
        done: boolean;
      }>();

      // insert 문
      const insert = db.prepare(
        'INSERT INTO todos (title, content, done) VALUES ($title, $content, $done)'
      );
      // insert 처리
      insert.run({ $title: title, $content: content, $done: done });

      return new Response(JSON.stringify({ title, content, done }), {
        status: 201,
      });
    }

    // highlight-start
    if (
      request.method === 'PATCH' &&
      url.pathname.split('/')[1] === 'todo' &&
      url.pathname.split('/')[2]
    ) {
      // body를 확인
      const { title, content, done } = await request.json<{
        title: string;
        content: string;
        done: boolean;
      }>();

      const [, path, id] = url.pathname.split('/');

      const updateTodo = db.prepare(
        `UPDATE todos SET title = ?, content = ?, done = ?  WHERE id = ?`
      );
      updateTodo.run(title, content, done, id);

      return new Response(JSON.stringify({ title, content, done }), {
        status: 201,
      });
    }
    // highlight-end

    if (
      request.method === 'DELETE' &&
      url.pathname.split('/')[1] === 'todo' &&
      url.pathname.split('/')[2]
    ) {
      const [, path, id] = url.pathname.split('/');
      const deleteTodo = db.prepare(`DELETE from todos WHERE id = ${id}`);
      deleteTodo.run();
      return new Response(null, { status: 204 });
    }

    return new Response('404!');
  },
});
http://localhost:3000/todo/2
{
  "title": "you don't even know json - ThePrimeagen",
  "content": "검색하지마세요",
  "done": true
}
위로 json을 PATCH 요청으로 보내면 갱신될 것입니다.
이렇게 작성하면 백엔드 API가 구현된 것입니다. 아직 서버사이드 라우팅은 없습니다. 또 테스트코드는 귀찮아서 안 넣겠습니다.
지금 다시보면 놀랍게도 라이브러리 설치 명령을 한번도 안했습니다.
주의사항
방금한 🐶짓거리랑 무관하게 Bun을 사용할 때 리스크가 있습니다.
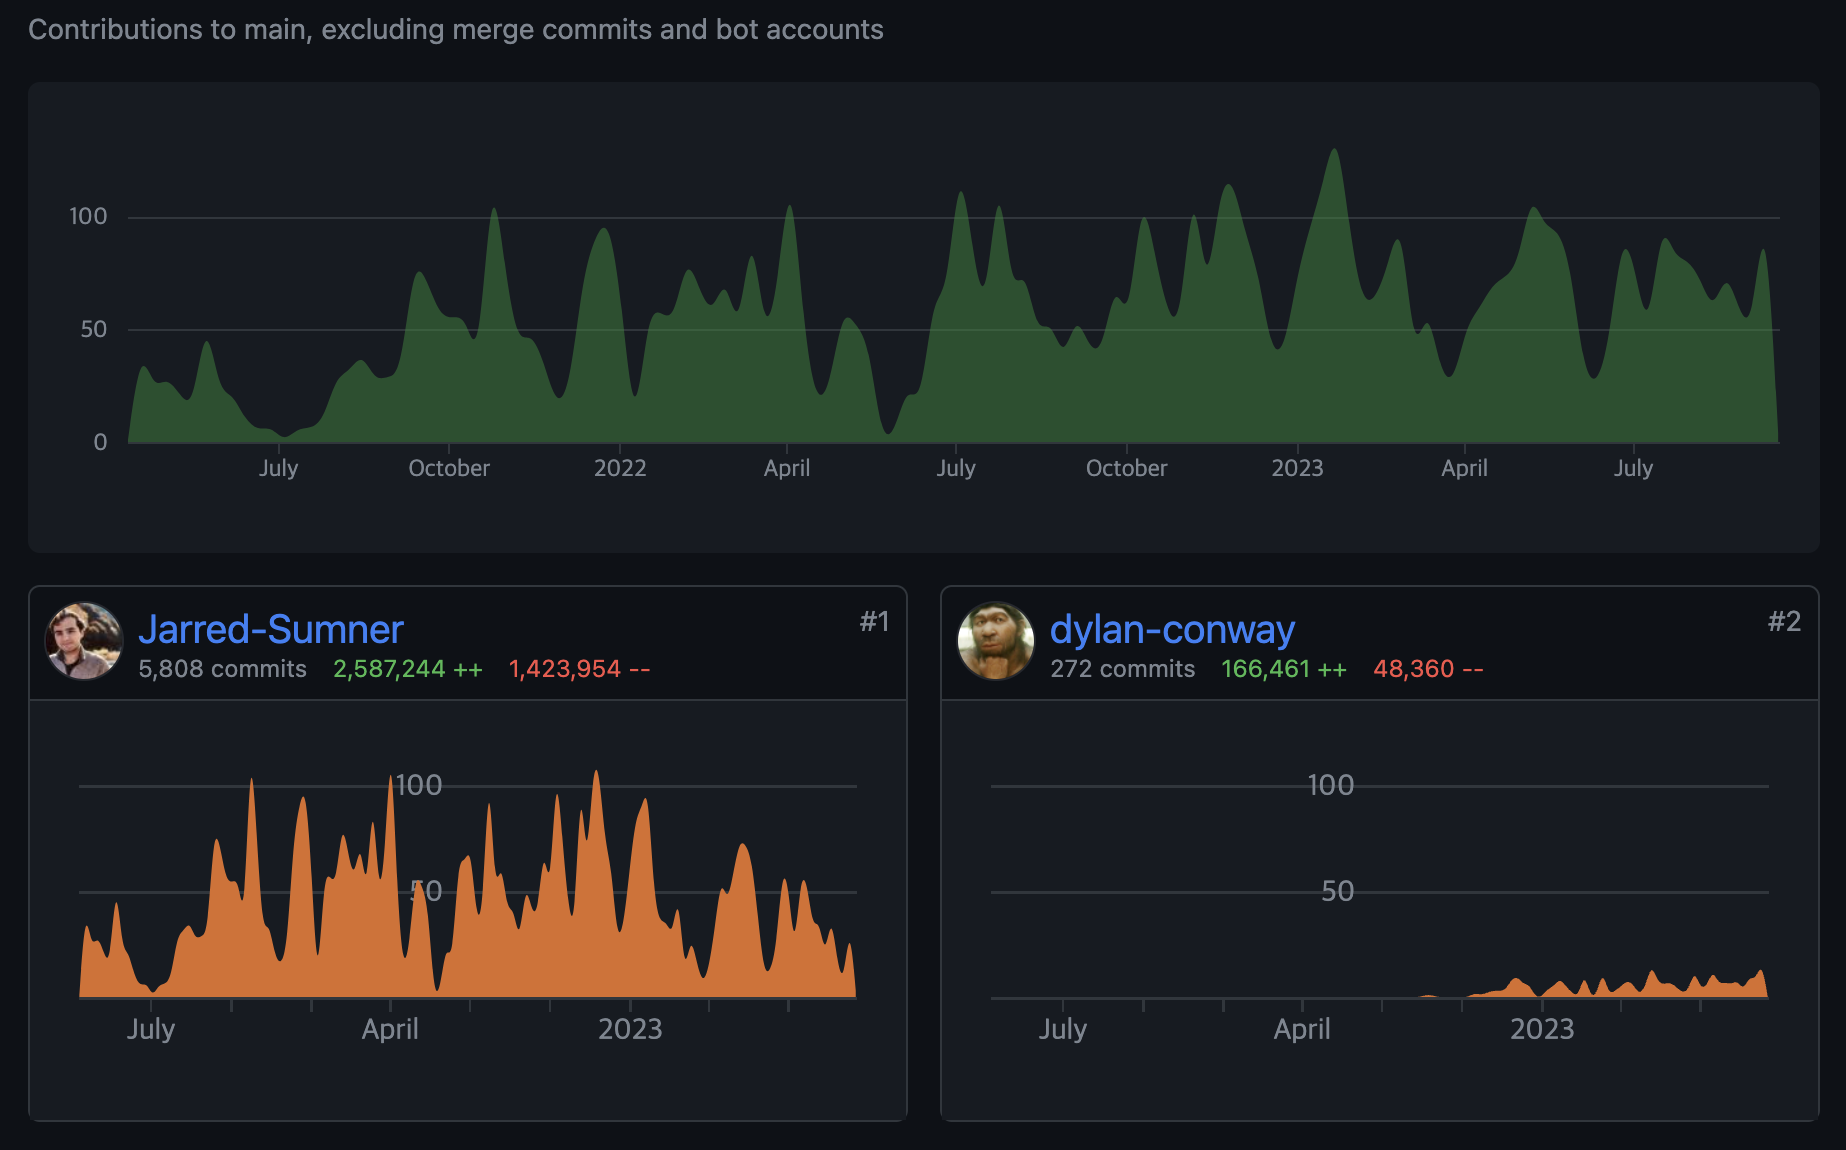
- 현재 bun Repo를 확인하면 Jarred Sumner가 대부분 만들었습니다.
- 만약에 Jarred Sumner가 버스에 치였다면 Bun은 유지보수하기 어려워집니다.
- 버그를 발견해도 반영히 엄청 느려질 것입니다.
- Bun은 VC의 지원을 받아 운영합니다.
- 펀딩이 끊기면 Bun도 지속하기 어려울 수 것입니다.
- 대표(Jarred Sumner)가 대부분 개발했습니다. 회사 경영활동으로 바빠지면 개발활동을 덜해서 진전이 느려질 수 있습니다.
- 물론 Jarred Sumner가 위임하는 개발자에 따라 달라질 수 있습니다.
- window 운영체제에서 사용하기 어렵습니다.
- 사실 별로 안 중요하고 나중에 지원할 것 같습니다.
- 이유를 추측해보자면 apple의 webkit(자바스크립트 엔진) 때문이라고 봅니다.
결론
오늘 저녁은 딤섬이 땡깁니다.